Taratura del tasto semiautomatico BUG
32. Operation
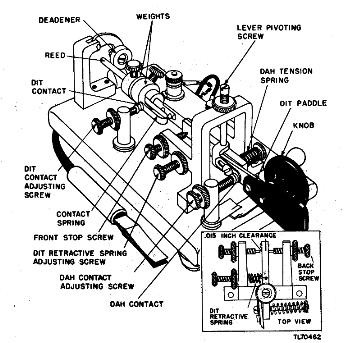
a. In sending with the bug the thumb presses against the dit paddle (see ig) to the right and the index finger forms dahs by pressing the knob to the left. The key will send successive dits when the paddle is held to the right. One dit or a series may be sent depending on how long the thumb pressure is maintained against the paddle. One dah is formed every time the knob is pressed to the left. Dahs must be sent individually.
b. During sending, the hand pivots at the wrist, and the hand and arm motion is horizontal.
33. Key Adjustment
a. Best operation of the semiautomatic key will be obtained when it is adjusted to send dits and spaces of equal length. Locate the parts in figure 14 when adjusting the key. The top view in figure 14 shows the section of the key between the dah contact adjusting screw and the front stop screw.
b. Before adjusting the semiautomatic key, examine it for mechanical and electrical defects. First, make, certain that both dit and dah contacts are clean and in perfect alignment, with the faces parallel. Second, make sure that the lever pivoting screw is loose enough to permit the lever to move freely. Signals will sound unsteady if it is too loose. Third, examine all supporting parts to make certain that they am firm and steady. Fourth, make certain that stop screws and lock nuts are tight. Fifth,inspect the cord and plug for short circuits or loose connections,
c. Adjust the key as follows:
(1) Place the key on a level surface.
(2) Adjust the back stop screw until the reed lightly touches the deadener. Then tighten the lock nut.
(3) Adjust the front stop screw until the separation between the end of this screw and the reed is approximately .015 inch. (Approx. 10 pp. of this manual inserted between the screw and lever will serve as a convenient guide.) Then tighten the lock nut. A greater separation is permissible if the operator prefers more lever movement.
(4) Operate the dit paddle to the right. Hold the lever in this position and stop the vibration of the reed. Adjust the dit contact adjusting screw until the dit contacts just meet. This important adjustment determines whether the dits will be too heavy, too light, or perfect. The adjustment must be made without flexing the contact spring.Tighten the lock nut on the dit contact adjusting screw without disturbing the adjustment.
(5) If the dits are too fast, move the weight, located on the reed, in the direction of the deadener. If the dits are too slow, move the same weight in the opposite direction.
(6) Adjust the dah contact adjusting screw to a clearance approximately the thickness of the cover on a Department of the Army field or technical manual.
(7) Adjust the dit retractive and dah tension springs for the most comfortable operation.
d. Do not readjust the dit contact adjusting screw unless a complaint is received or unless you are certain that your dits are too heavy or too light. Never change the back stop screw adjustment when the bug is correctly adjusted. It should not be necessary to change the front stop screw adjustment. However, if the lock nut on the front stop screw should become loose, it will be necessary to readjust the dit contact adjusting screw. If the dah contact adjusting screw is too close, the dah contacts will remain shorted.
e. A change in the position of the weight for the speed of dits or a change in the tension of the retractive and dah springs to suit the individual's requirements will not throw the bug out of proper adjustment.
f. If the adjustment instructions are followed carefully, the bug will make 25 or more dits before stopping. The first 12 to 15 dits will be practically perfect with the dits and spaces equal.
g. The bug is designed to make sending easy rather than fast, and perfect control of the key is far more important than speed. Be especially careful to send dits accurately. Not all radio operators have equally sensitive hearing, and careless sending on the semiautomatic key will not be understood.
Fonte : qui
Diego Piscina IW2MXE - AG6WJ